





Blog
Insights & updates from our experts


Resolve plant floor and IT issues before they disrupt production.

Stay audit-ready while resolving issues and reducing operational risk.
Resolve issues quickly with an AI-powered system that automates ticketing.
Unifiy IT, HR, Facilities, Finance, and more on a single, AI-powered service platform.
Simplify on-call scheduling, automate escalations, and reduce burnout.
Automate postmortems, AI summaries, and post-incident workflows
Create, organize, and continuously improve your knowledge base to find the right answers with Sera AI.
We're here to help

The integration with Atlassian Jira using the Xurrent Integration Service is

The integration with Atlassian Jira using the Xurrent Integration Service is

The integration with Atlassian Jira using the Xurrent Integration Service is

The integration with Atlassian Jira using the Xurrent Integration Service is

The integration with Atlassian Jira using the Xurrent Integration Service is

The integration with Atlassian Jira using the Xurrent Integration Service is

The integration with Atlassian Jira using the Xurrent Integration Service is

The integration with Atlassian Jira using the Xurrent Integration Service is
Resolve issues quickly with an AI-powered system that automates ticketing.
Unifiy IT, HR, Facilities, Finance, and more on a single, AI-powered service platform.
Simplify on-call scheduling, automate escalations, and reduce burnout.
Automate postmortems, AI summaries, and post-incident workflows
Create, organize, and continuously improve your knowledge base to find the right answers with Sera AI.
Resolve plant floor and IT issues before they disrupt production.
Stay audit-ready while resolving issues and reducing operational risk.

Detect, respond, and resolve incidents fast to cut downtime and MTTR.

Keep your store online, even during your biggest sales moments.

Protect patient data and resolve issues fast, so care teams stay focused on care.

Standardize service delivery across every store and channel.

We are here to help 24/7

Connect with other Xurrent Users

Get insights and tips on how to get the most out of Xurrent

Apps, APIs, and updates

Xurrent service functionality

Eliminate manual tasks, optimize workflows, and deliver faster resolutions.
Learn how organizations have reduced downtime, improved 50% MTTA & MTTR, and cut costs with Xurrent IMR.
Discover Xurrent IMR's quick support, bidirectional integrations with Jira and Slack, and more cohesive incident response capabilities compared to Opsgenie.
Understand why users value Xurrent IMR for its intuitive interface, efficient incident alerting, customizable On-call schedules, and escalations.

For the purpose of the following examples, we'll reference a sample incoming alert, like the one below:
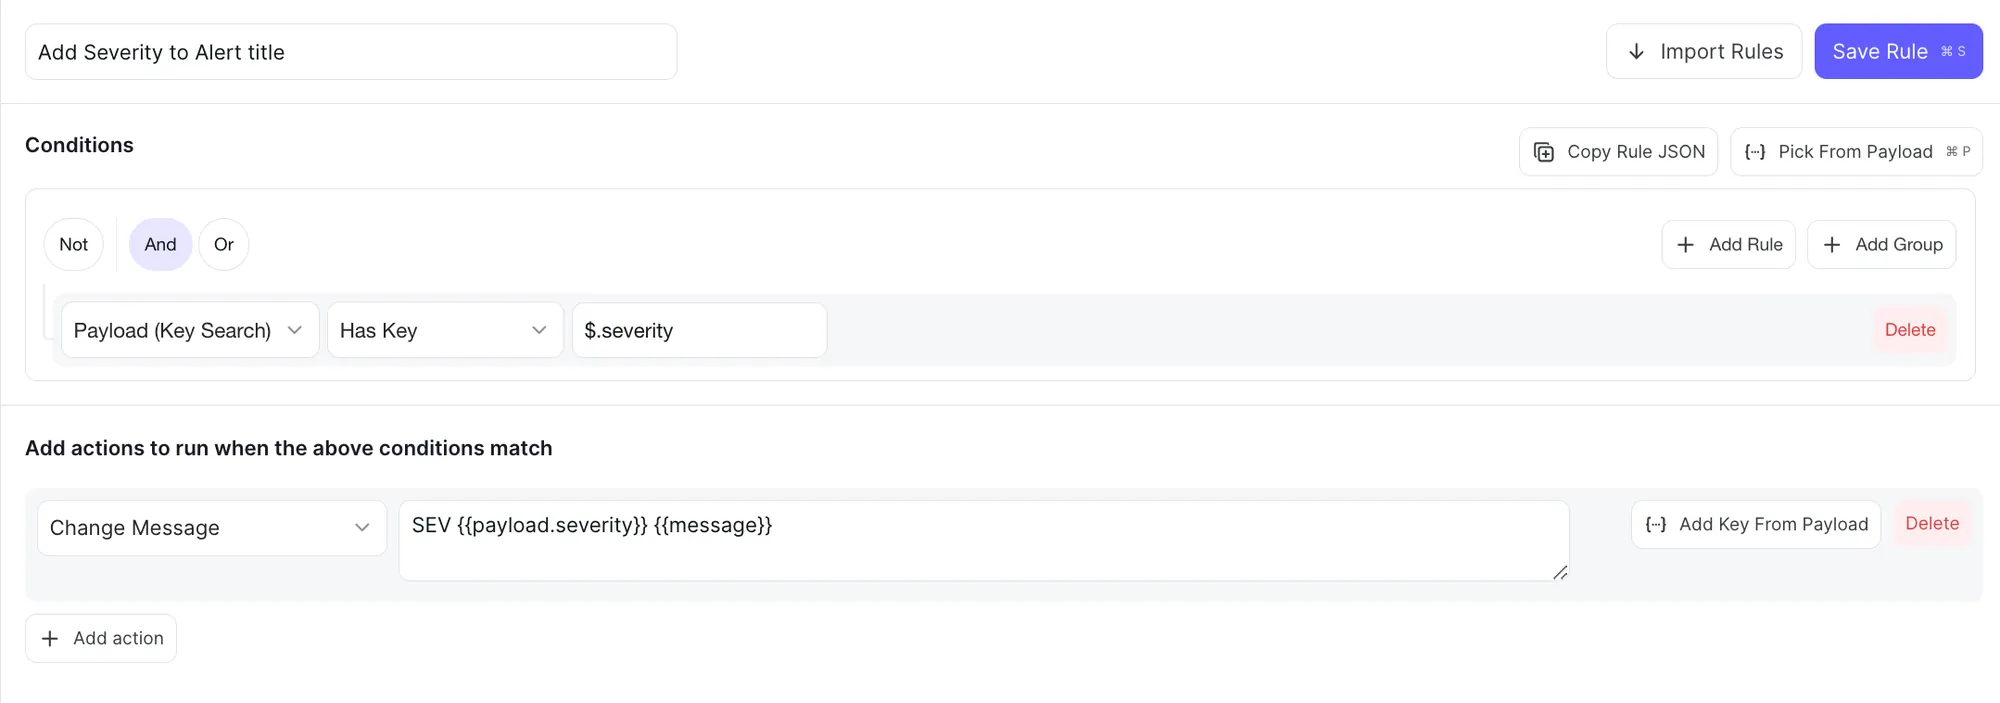
You can modify the incident titles and summaries by using the alert data(message, summary, entity_id, payload) within placeholders like The incident message is {{ message }}, or The incident summary is {{summary}} or Incident Created with Status - {{payload.status}} in release {{payload.release.version}}.
Let's say our payload also contains an additional field specifying the URL that caused the issue - "url": "www.acme.com/checkout/payments/issue-url/"
If we want to attach this field to our summary for additional context, we can modify the alert summary by using a rule with Payload Key Search as shown below:


The above issue can also be solved via maintenance windows.

This Alert Rule would suppress similar recurring incidents that your team has already resolved in the last X seconds. A similar incident according to Xurrent IMR is a previous incident created with the same entity_id as the new incoming alert. This can be applied in cases where the issue has been resolved in Xurrent IMR but the alert source is still sending alerts shortly after a similar incident was resolved.


The above alert rule would automatically resolve an incident when receiving an alert with Closed mentioned in the title.

If there's an Incident with security mentioned in the title, the above rule will attach the Resolved Alert to the Incident as an Info Alert, prevent auto-resolution and attach a note letting responders know that there's manual investigation required.
In the below example, if we have a key metric.name available in the payload JSON path, Xurrent IMR will use its value as the entity_id; overriding the default entity_id.

Every alert coming from an integration source has an entity_id.
An entity_id points to a resource or an entity in the source application, for eg: the entity_id of an alert from Jira will be its Ticket ID.
There are some tools integrating with Xurrent IMR that allow you to use a custom payload for notifications. In such cases, it is possible to sync the Xurrent IMR Alert Entity ID with a user-specified value being sent by the integration, enabling easier association and collation if required.

The above rule would collate all incidents with a certain matching phrase into a single incident by changing their entity_id to a preset value. This may be useful to collect similar incidents with a single course-of-action fix or repetitive warnings together.

You can also hash your Entity ID by using the Hash Entity ID action. This allows integrations to accept Entity IDs longer than 32 characters, which are hashed and replace the original entity ID. The original entity ID is still viewable in the alert payload.

The above rule will create a new incident if receiving a similar alert after 30 minutes since the first incident was created and add Recurring to the title.
Leaving the Change Alert Entity ID field blank assigns the incident a random entity_id, allowing you to override collation in such cases and create new Xurrent IMR Incidents for recurring alerts. This particular rule is not recommended generally as it leads to an incremental amount of noisy alerts, however may solve some issues depending on the tooling.


In the above example, we're matching the team associated with the event and adding an additional responder in case the incident is regarding the DevOps team.
We can specify the indice that we'd like to be parsing whenever required.
So, if we want to know the secondary team associated with our event, we can change the above rule by replacing $.team[0] with $.team[1].


The Add Note action is only applied for the first alert that triggered the incident. For any alert that does not directly trigger an incident, the Add Note action will not be applied.


You can use alert rule groups to build more intricate logical rules for niche use cases like the one above, in which the incident urgency will be set to low, if the project is kubenonprodOR if the project is kubeprodANDmodule.name is logging.

If you want to disable the default deduplication/grouping logic for an integration and want to trigger new incidents for all incoming alerts, then use the above alert rule. here we are catching all alert types in the condition, and using the action "Change entity Id" and keeping the value as blank/empty. This action will create a random and unique entity id for all alerts, which will in turn tell Xurrent IMR to trigger new incidents for all incoming alerts.
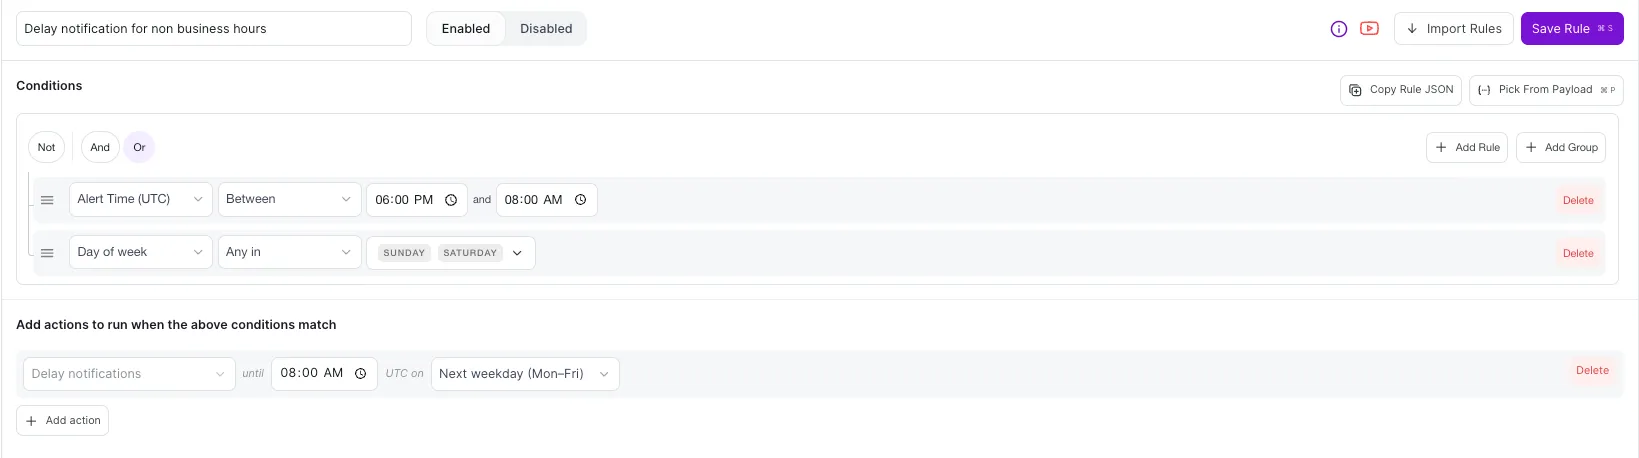
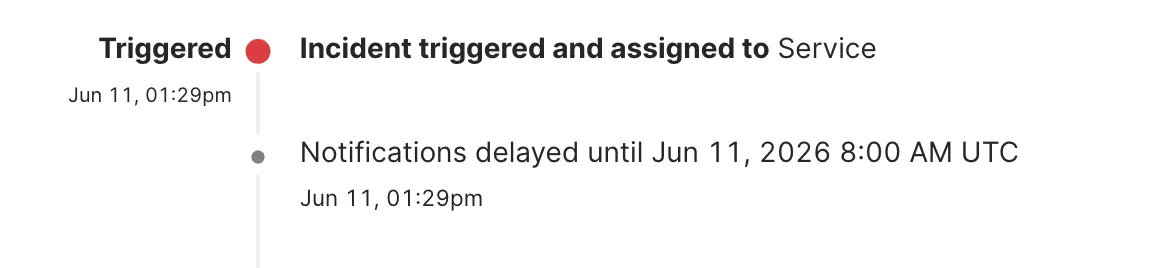
The Delay Notifications action holds notifications for any new incoming alert until a specified due time, instead of notifying responders immediately. This is useful when an alert is raised outside of working hours and doesn't require an immediate response — for example, a low-priority alert that comes in overnight can be held until the start of the next business day so responders are notified at a reasonable time.
When configuring the action, you set the time, and day the notifications should be released. In the example below, notifications for matching alerts will be held until 08:00 AM UTC on Thursday:
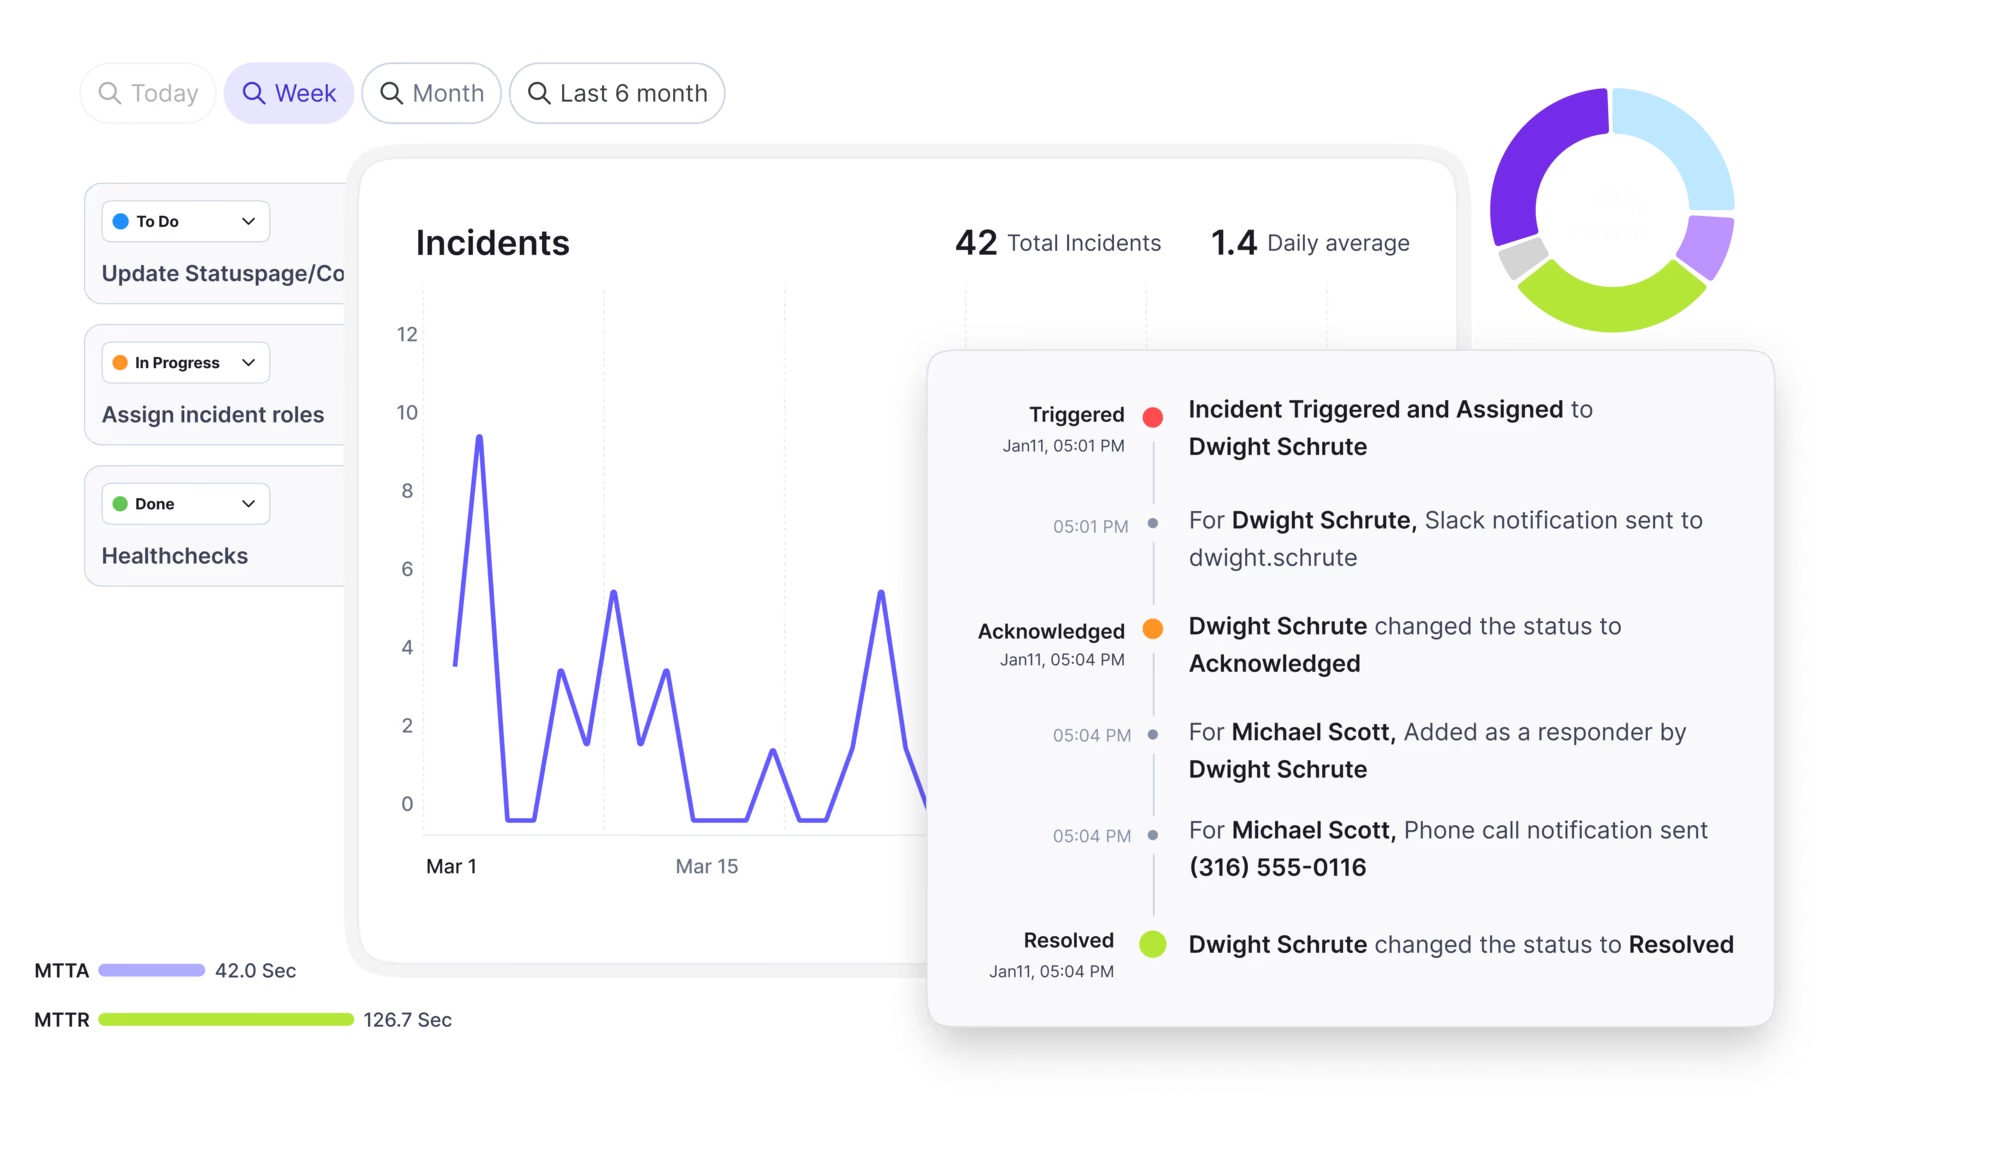
The incident is still triggered and assigned as soon as the alert is received — only the responder notifications are delayed. The incident timeline reflects this clearly, showing the trigger event followed by the time until which notifications are held:
Once the due time is reached, notifications are released and responders are notified as per the escalation policy.
Note: The delayed notification will be canceled if the incident is acknowledged or resolved, or if a user is added as a responder, before the due time is reached. In these cases, the held notification will not be sent at the scheduled delay time.
The Create Incident action holds matching alerts back until more than a chosen number of them arrive within a rolling time window, and then creates a single incident for the whole burst. This is useful for sources that are harmless on their own but serious in volume — a retrying batch job, a flapping health check, or a rate-limited API. One error is noise; more than five in fifteen minutes means the job is genuinely failing and someone should be paged.
When configuring the action, you set the alert count and the window. In the example below, the incident is created once more than 3 matching alerts arrive within 10 minutes — that is, on the 4th alert:
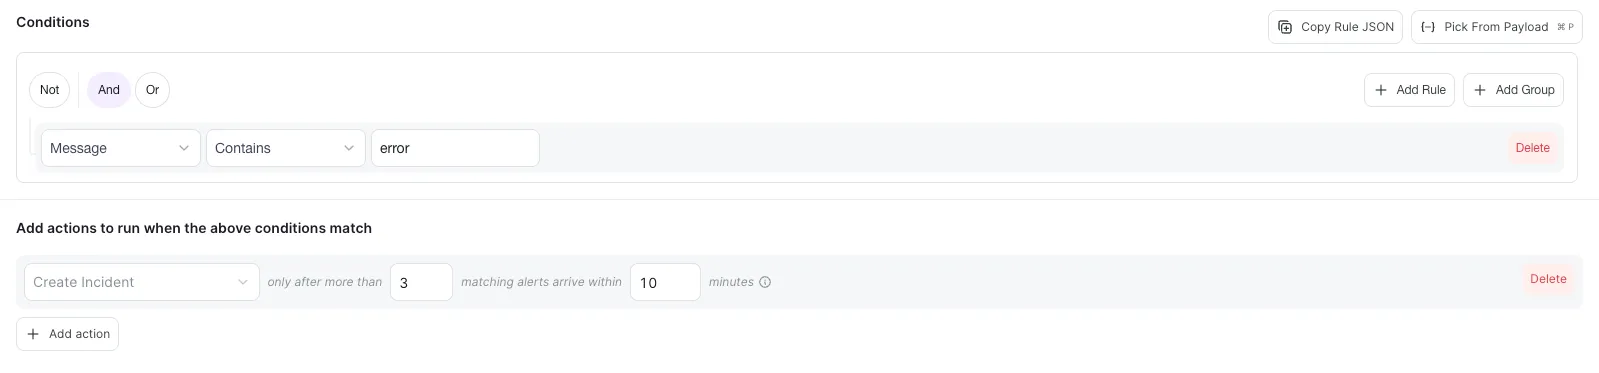
Until the threshold is crossed, matching alerts are stored as suppressed against the integration. They appear in the integration’s alert list but create no incident and notify nobody. Once the incident exists, further matching alerts are attached to it instead of opening new incidents or paging again. After the incident is resolved, the rule starts counting from scratch and the next breach creates a fresh incident.
The window is rolling, measured backwards from each incoming alert — not a fixed clock interval such as 09:00 to 09:10. So a burst that straddles a clock boundary is still caught. With the settings above:
Only alerts whose type would normally create an incident on the integration are counted, as per the integration’s Create incidents for setting. Info, Acknowledged and Resolved alerts are never counted. To include a type the integration would otherwise ignore, add a Change Alert Type action to the same rule — for example, on an integration set to Critical only, a rule with Change Alert Type to Critical plus Create Incident will count Warning alerts as well.
Combining with other actions
Note: A rule can hold only one Create Incident action, and it cannot be combined with Suppress — saving fails in either case. Editing the rule resets its count and releases its link to any open incident, so the next breach creates a new incident.
You can also leverage RBAC with Alert Rules to route incidents to other teams or add global users as responders. Learn More
If you're still wondering whether Alert Rules could solve a particular use-case of yours, feel free to reach out to our team at contact@zenduty.com.



.webp)
.webp)