.webp)


Blog
Insights & updates from our experts
Resolve issues quickly with an AI-powered system that automates ticketing.

Resolve issues quickly with an AI-powered system that automates ticketing.

Resolve issues quickly with an AI-powered system that automates ticketing.

Resolve issues quickly with an AI-powered system that automates ticketing.
Resolve issues quickly with an AI-powered system that automates ticketing.
Resolve issues quickly with an AI-powered system that automates ticketing.
Simplify on-call scheduling, automate escalations, and reduce burnout.
Automate postmortems, AI summaries, and post-incident workflows
We're here to help

The integration with Atlassian Jira using the Xurrent Integration Service is

The integration with Atlassian Jira using the Xurrent Integration Service is

The integration with Atlassian Jira using the Xurrent Integration Service is

The integration with Atlassian Jira using the Xurrent Integration Service is

The integration with Atlassian Jira using the Xurrent Integration Service is

The integration with Atlassian Jira using the Xurrent Integration Service is

The integration with Atlassian Jira using the Xurrent Integration Service is

The integration with Atlassian Jira using the Xurrent Integration Service is
Resolve issues quickly with an AI-powered system that automates ticketing.
Resolve issues quickly with an AI-powered system that automates ticketing.
Simplify on-call scheduling, automate escalations, and reduce burnout.
Automate postmortems, AI summaries, and post-incident workflows
Resolve issues quickly with an AI-powered system that automates ticketing.
Resolve issues quickly with an AI-powered system that automates ticketing.
Resolve issues quickly with an AI-powered system that automates ticketing.
Resolve issues quickly with an AI-powered system that automates ticketing.

We are here to help 24/7

Connect with other Xurrent Users

Get insights and tips on how to get the most out of Xurrent

Apps, APIs, and updates

Xurrent service functionality
Eliminate manual tasks, optimize workflows, and deliver faster resolutions.
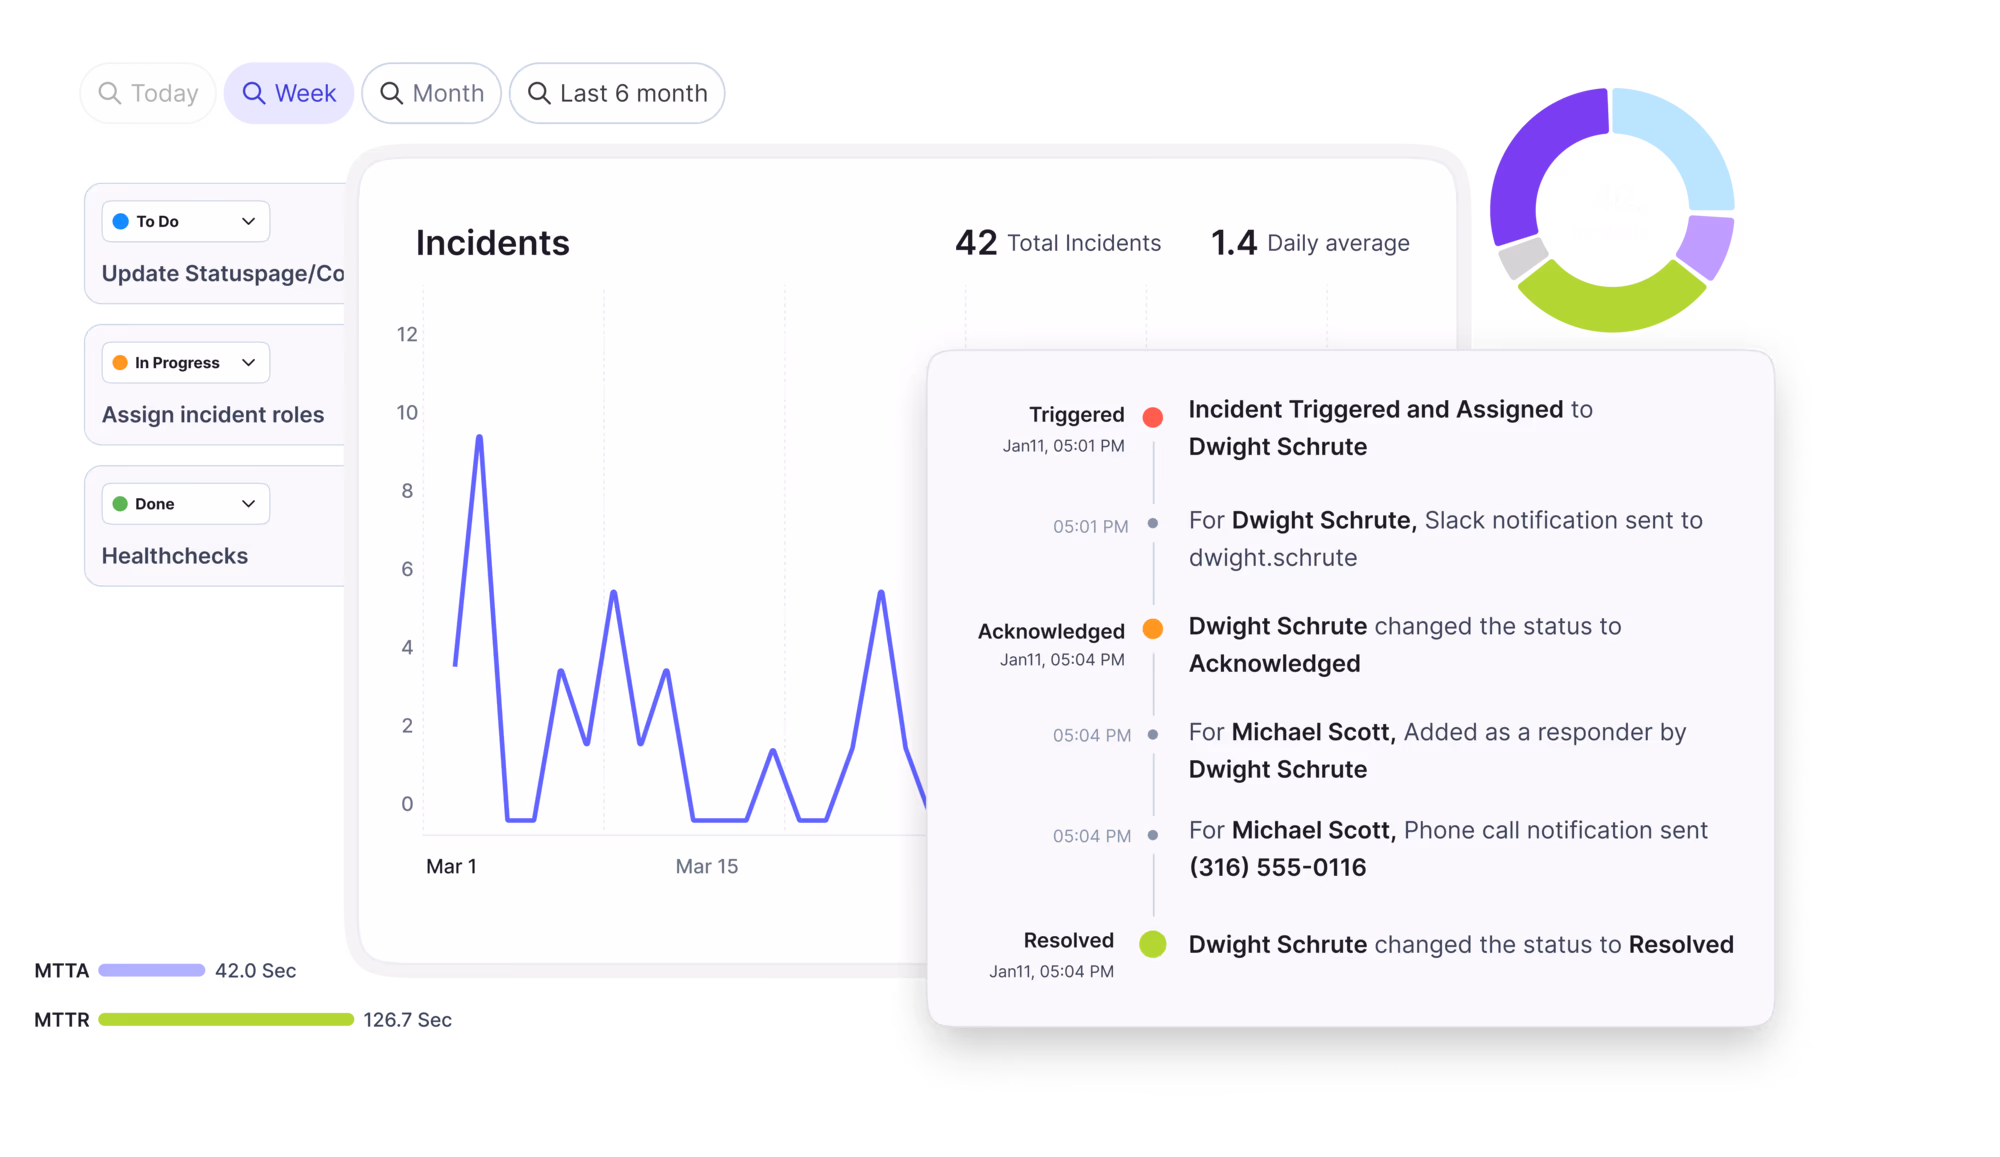
Learn how organizations have reduced downtime, improved 50% MTTA & MTTR, and cut costs with Xurrent IMR.
Discover Xurrent IMR's quick support, bidirectional integrations with Jira and Slack, and more cohesive incident response capabilities compared to Opsgenie.
Understand why users value Xurrent IMR for its intuitive interface, efficient incident alerting, customizable On-call schedules, and escalations.

N-Central (N-Able) connection enables monitoring and management integration between Xurrent and N-Central.
This guide provides step-by-step instructions for installing the N-Central (N-Able) app in Xurrent and configuring it to automatically generate tickets from N-Central. It covers three main sections:
1. Installing the App in Xurrent – How to add the N-Central app and provide the necessary configuration details.
2. Configuring PSA Integration in N-Central – How to set up the API-based integration and validate connectivity.
3. Configuring Custom Tags and Ticket Recipients in N-Central – How to define recipients, assign custom tags, and associate them with request templates and service instances in your account.
Each section includes a general description and, where useful, a specific example for creating a ticket for a policy compliance incident
1. Installing the N-Central App in Xurrent
1. Open the Xurrent App Store and locate the N-Central (N-Able) app.
2. During installation, provide the following configuration details:
Service Instance Name (Required) :
Examples:
“N-Central Incident” → For general incidents.
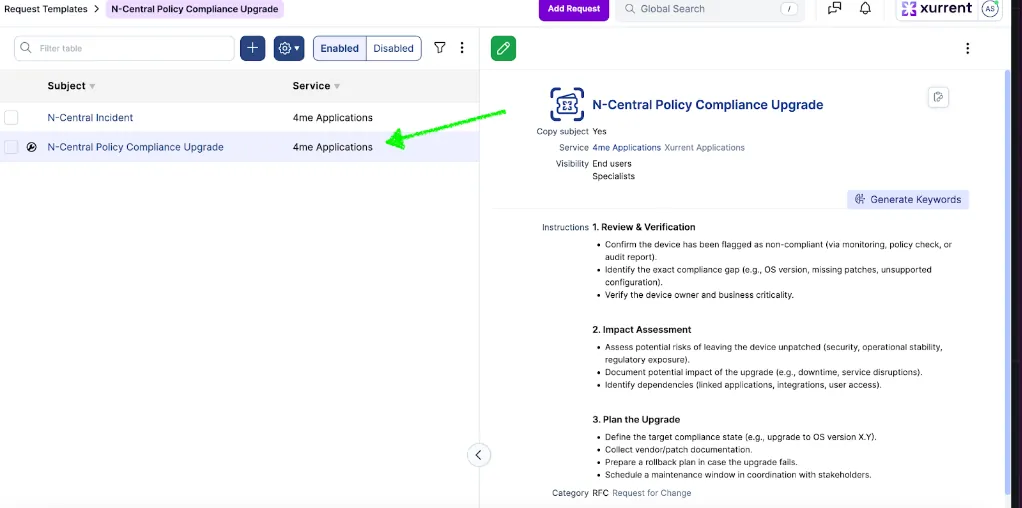
“N-Central Policy Compliance Upgrade” → For policy compliance upgrade issues.
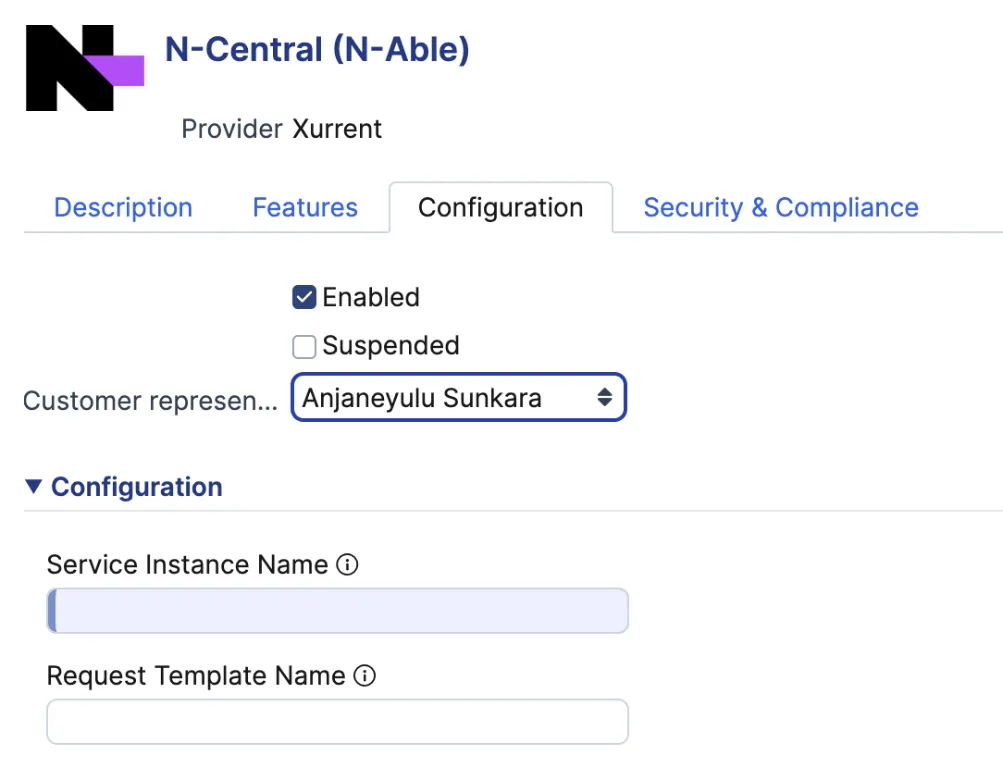
Save the app. The app will generate integration details required for N-Central.
If the details do not appear immediately, refresh the screen.
If the details are still missing after one minute, contact Xurrent support or try reinstalling the app.
Note: Ensure the configuration values shown match your account. Do not copy values from screenshots, as user names or passwords may differ.
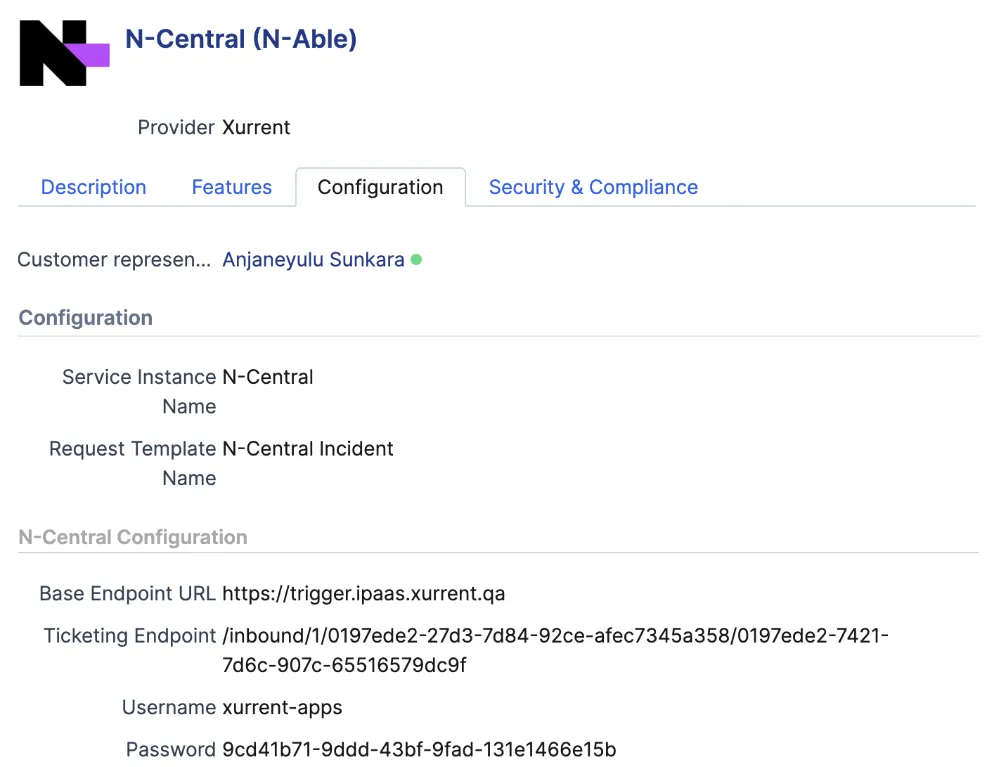
2. Configuring PSA Integration in N-Central
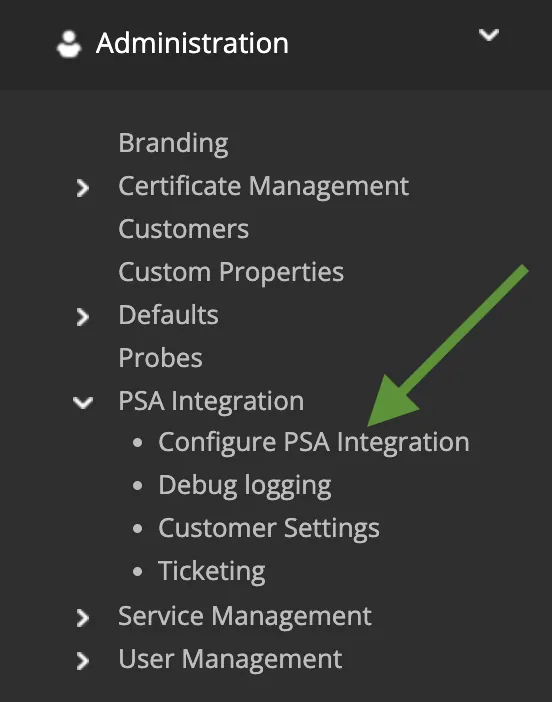


Ensure that the user name and password fields accurately reflect what you have pasted from Xurrent.
3. Configuring Custom Tags and Ticket Recipients in N-Central :
Adding ticket recipients and custom tags allows you to control which type of tickets are created in Xurrent and how they are categorized. These tags can override default app configurations (such as Service Instance & Request Template) and ensure tickets are routed correctly to service instances.
You can configure multiple recipients in N-Central and specify Custom tags (impact,category,tags..etc) for when each recipient is used, such as based on alert type or monitored resource.
Don’t forget to update the description to indicate the specific use case for which each recipient should be used.
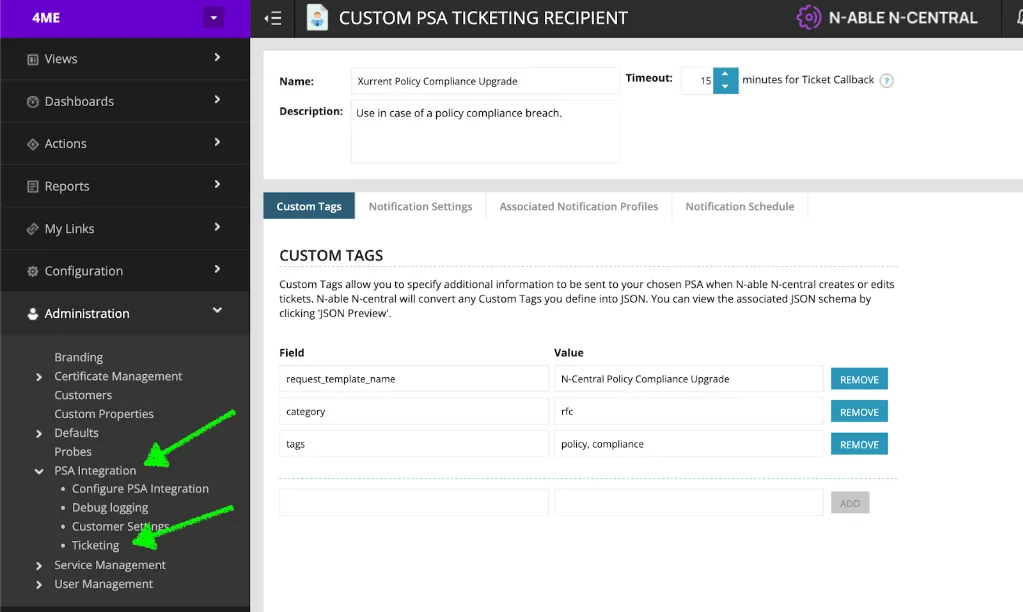
7. Click ‘Save’ to confirm the recipient.
Note : Adding tags allows you to override the defaults documented in the knowledge article for ticket creation.
| Field Name | Example Value (Use Case) |
|---|---|
| impact |
Top / High / Medium / Low
Use to indicate ticket urgency or priority.
|
| request_template_name |
Use the Subject from Request Templates in your Xurrent account
Automatically ties incoming alerts to a pre-defined request template.
|
| category |
"incident" → For incident tickets. "rfi" → Request for Information. "rfc" → Request for Change, etc. Use a short keyword to classify ticket type for routing or SLAs.
|
| tags |
"policy", "compliance", "security", "patching"
Add keywords to better classify or filter tickets.
|
| service_instance_name |
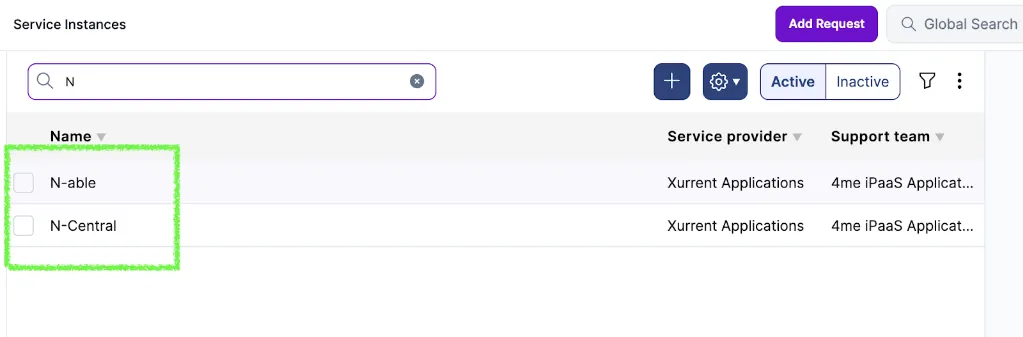
Use the Name of the Service Instance from your Xurrent account
Maps the ticket to the correct customer/service instance for routing and ownership.
|
Tip: Keep field values concise and standardized (e.g., use a controlled vocabulary for impact and category) to simplify filtering and automation.
The request_template_name and service_instance_name values must match the subject and service instance name configured in the Xurrent app, as shown in the screenshots below. When these values are provided in the N-Able custom tags, they are used to create the ticket with the corresponding configuration.
Request_template_name :
Service_instance_name :
Note : The configurations described in this documentation are for demo purposes only. Please adapt and apply the configurations according to your organization’s specific requirements and environment.


.webp)
.webp)