

Blog
Insights & updates from our experts
Resolve issues quickly with an AI-powered system that automates ticketing.

Resolve issues quickly with an AI-powered system that automates ticketing.

Resolve issues quickly with an AI-powered system that automates ticketing.

Resolve issues quickly with an AI-powered system that automates ticketing.
We're here to help

The integration with Atlassian Jira using the Xurrent Integration Service is

The integration with Atlassian Jira using the Xurrent Integration Service is

The integration with Atlassian Jira using the Xurrent Integration Service is

The integration with Atlassian Jira using the Xurrent Integration Service is

The integration with Atlassian Jira using the Xurrent Integration Service is

The integration with Atlassian Jira using the Xurrent Integration Service is

The integration with Atlassian Jira using the Xurrent Integration Service is

The integration with Atlassian Jira using the Xurrent Integration Service is
Resolve issues quickly with an AI-powered system that automates ticketing.
Resolve issues quickly with an AI-powered system that automates ticketing.
Resolve issues quickly with an AI-powered system that automates ticketing.
Resolve issues quickly with an AI-powered system that automates ticketing.

We are here to help 24/7

Connect with other Xurrent Users

Get insights and tips on how to get the most out of Xurrent

Apps, APIs, and updates

Xurrent service functionality
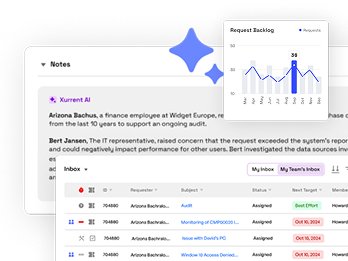
Eliminate manual tasks, optimize workflows, and deliver faster resolutions.
Learn how organizations have reduced downtime, improved 50% MTTA & MTTR, and cut costs with Xurrent IMR.
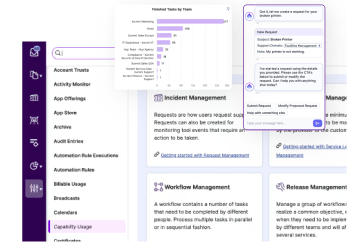
Discover Xurrent IMR's quick support, bidirectional integrations with Jira and Slack, and more cohesive incident response capabilities compared to Opsgenie.
Understand why users value Xurrent IMR for its intuitive interface, efficient incident alerting, customizable On-call schedules, and escalations.

A step-by-step guide to promoting solutions and transferring them between environments using import and export functionality.
Promote is the action that moves your solution from the draft state to the live environment.
Once promoted, all configured changes become active and available for execution, such as triggering workflows or accepting incoming requests (e.g., webhook payloads).
Once the setup is complete, follow these steps:

2. Provide a meaningful name so you can easily identify and restore this version in the future if needed

Click Save to store the version.
3. Open the three-dot menu again and select Promote to move your draft changes to the live environment.


The Import / Export feature allows you to transfer a solution from one environment (for example, development or staging) to another (such as testing or production). This helps in reusing configurations without rebuilding them from scratch.
Exporting creates a packaged copy of your solution that can be reused elsewhere.
What this means:

Importing allows you to bring an exported solution into a different environment.
What this means:


Once the solution is promoted, a confirmation message will appear in the bottom-right corner indicating that the solution was successfully imported.

Note: After importing the solution, the connection credentials will be empty. You must configure them manually


.jpg)