

Blog
Insights & updates from our experts
Resolve issues quickly with an AI-powered system that automates ticketing.

Resolve issues quickly with an AI-powered system that automates ticketing.

Resolve issues quickly with an AI-powered system that automates ticketing.

Resolve issues quickly with an AI-powered system that automates ticketing.
We're here to help

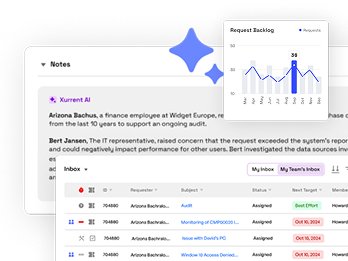
The integration with Atlassian Jira using the Xurrent Integration Service is

The integration with Atlassian Jira using the Xurrent Integration Service is

The integration with Atlassian Jira using the Xurrent Integration Service is

The integration with Atlassian Jira using the Xurrent Integration Service is

The integration with Atlassian Jira using the Xurrent Integration Service is

The integration with Atlassian Jira using the Xurrent Integration Service is

The integration with Atlassian Jira using the Xurrent Integration Service is

The integration with Atlassian Jira using the Xurrent Integration Service is
Resolve issues quickly with an AI-powered system that automates ticketing.
Resolve issues quickly with an AI-powered system that automates ticketing.
Resolve issues quickly with an AI-powered system that automates ticketing.
Resolve issues quickly with an AI-powered system that automates ticketing.

We are here to help 24/7

Connect with other Xurrent Users

Get insights and tips on how to get the most out of Xurrent

Apps, APIs, and updates

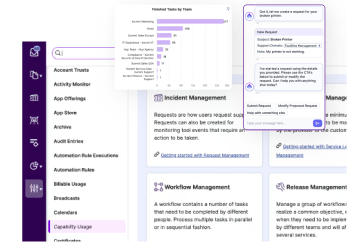
Xurrent service functionality
Eliminate manual tasks, optimize workflows, and deliver faster resolutions.
Learn how organizations have reduced downtime, improved 50% MTTA & MTTR, and cut costs with Xurrent IMR.
Discover Xurrent IMR's quick support, bidirectional integrations with Jira and Slack, and more cohesive incident response capabilities compared to Opsgenie.
Understand why users value Xurrent IMR for its intuitive interface, efficient incident alerting, customizable On-call schedules, and escalations.

Quickly set up and run your first integration using Xurrent iPaaS.
Xurrent iPaaS is an enterprise-grade platform that automates workflows between cloud and on-premises apps. It combines a powerful orchestration engine with a visual interface, allowing users to build complex integrations without deep coding knowledge.
Built for reliability, security, and high performance. Xurrent handles mission-critical data across diverse environments at scale.
Our "Single-Interface" philosophy removes technical barriers, providing a unified environment for all users:
Before building your first automation, it is important to understand the core components of the Xurrent ecosystem.
A Solution is a high-level organizational container that groups related integrations together. It acts as the "Command Center" for a specific business process. Inside a Solution, you manage Runbooks, Connections, and Environment Variables.
A Runbook is the individual automated workflow. It contains the logic and steps required to complete a specific task. Runbooks are modular; you might have one Solution for "Human Resources" containing multiple Runbooks like "New Hire Sync" and "Termination Access Revoke."
A Connection authorizes a Runbook to interact with apps like Salesforce, Jira, or N-Central.
A Trigger specifies the event that initiates the steps in a Runbook.
Every step in a Runbook, starting with the Trigger, produces output data. This data is organized and made accessible through the Datatree.
Triggers and Actions include Input Fields that define how the workflow should execute. Inserting variables (Datapills) or Constants into these fields is called Mapping.
A Job represents the flow of a single trigger event through the Runbook. Each time a trigger event occurs (e.g., one new ticket is created), the Runbook executes its actions, creating one unique Job.
The Factory provides a high-level summary of all Jobs processed by a Runbook.


.jpg)